
 Still photography is mostly understood as freezing a moment in time for eternity. But representing motion in a still image produces dramatic results. Motion blur is usually associated with movingsubjects captured with a stationary or ‘near-stationary’ camera. But how about creating motion in a stationary subject using your camera or lens? The technique is not new, but a zoom burst is still used to add drama to an otherwise ordinary image.
What is Zoom Burst?
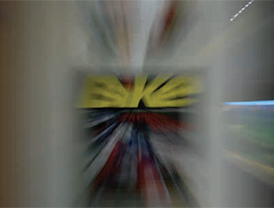
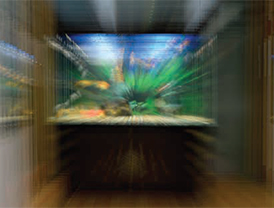
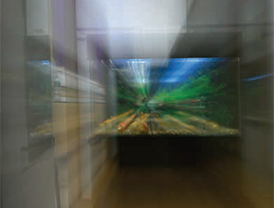
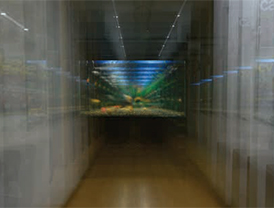
A zoom burst utilises the change in focal length brought about by zooming action to cause a blur effect in a photograph. The result is an imploding or exploding effect with the least blur at the centre of the frame, increasing radially outward. The beauty of zoom burst technique is that you can do it with basic equipment—a D-SLR, a zoom lens and if possible, a tripod. Though the tripod is optional we would recommend using one for a perfect zoom burst since we are going to use long shutter speeds.

Preparing for the shoot
First, affix a zoom lens on your D-SLR. We wouldn’t recommend very long zoom lenses since small zooms provide better control. Keep lights dim or wait for the sun to go down. The idea is to keep the shutter open for a sufficiently long time for you to zoom in or out. Now mount the camera on a steady tripod (or support yourself by leaning on a wall and holding your breath if not using a tripod). Set the camera to one of the priority modes. Aperture is not important here since only the focal point needs to be sharp. If you are using the camera hand-held, choose a shutter speed between 1/15 and 1 sec. If you are using a tripod, we would recommend between 1 and 10 sec. Now find a point of interest and focus in it.
Capturing the zoom trails
Note that you do not need to zoom from one end to the other. Short zoom ranges work best. You can start zooming from either the telephoto end towards the wide-angle end (zoom out) or in the reverse direction (zoom in). First start zooming and then press the shutter release button. Stop zooming before the shutter closes so that the frame at the last position is captured with reasonably good sharpness. A flash fired with first or second curtain sync at a low power can also help freeze the last frame. If your image is over-exposed, apply suitable compensation and try again.

Zoom In
If you zoom in from the wide-angle to telephoto end, the final image will have an ‘exploding’ effect where the central point appears to come closer to you.
Zoom Out
If you zoom out from the telephoto to the wide-angle end, you will get an ‘imploding’ effect in which the central point appears to move away from you. This is much more dramatic than zooming in.

Zooming in steps
In the previous images, we have seen the effects of continuous zooming at a constant speed. But some times, you get a better effect by zooming in slightly varying increments. The technique is to rotate the zoom ring bit-by-bit, allowing a fraction of a second at every stop to register the image. For this, you may need to keep a longer shutter speed than what you require for continuous zoom, allowing for the stops in between. Typically, 4 to 10 seconds will work best.
Zoom burst images are fun to execute, but it requires lot of patience. Timing is crucial for perfect zooming effect. You will have to experiment a lot to get the effect you want. Do try this technique and share the results with us. |SP
— By Sujith Gopinath
