Step-4 Randomising images before actual judging
After previewing all the images, the actual judging session starts. When all the photos have been displayed, the slide show automatically stops and you can see the thumbnails again. Anytime between the slideshow, if you need to stop it, just press the Esc button on the keyboard. Now you should randomise the order of the photographs or ‘shuffle’ them as you used to do in manual judging. For this, first click CTRL+A to select all the photographs of the folder then click the view menu to expand it. Now click View> Sort and you will see many types of sorting methods. As the dimension, colour profile and size of images will be almost the same as that of received images, you can sort them by file name, date created or date modified. Just click any of the options and the file will be sorted accordingly.
Step-5 Actual judging session and embedding markings in each photo
To start the judging, first click CTRL+A to select all the photographs of the folder and then just press SPACE BAR. You will see that one photograph is displayed on the monitor in full screen. Now let the judges give their YES or NO remarks. You will rate the photograph with stars accordingly. Suppose all judges say ‘yes’ to a photograph, then the photo will be given a three-star rating. If only two judges give ‘yes’, then the photo will be given two stars, and if only one judge gives yes then the photo will be given one star. If all judges say ‘no’, then the photo will not be given any star. For star rating the projected photograph, just press CTRL+1, 2, or 3 — 1 for one star, 2 for two stars and 3 for three stars. Your star rating will show on the left side, below the image as you can see in the screen shot. This way, star mark all the selected photos. Similarly, open the folders of each section and rate them with stars and the first round of judging is over. Let judges take rest for some time and in this gap, sort your photos according to their star ratings.
 Step-6 Short-listing Images
Short-listing images according to their star mark is very easy . For this, first click CTRL+A to select all photographs in the folder. On the right upper side of the bridge interface, you will see a star mark. Click on it and you will get many sorting options. Select ‘Show 3 or more stars’ and because there is no image having more than 3 stars, you will see only 3-starred images. Click CTRL A to select all three-star rated images and then Press CTRL+X to cut all the images. Now make a new folder and name it as Three star or any way you like and paste all the three-starred photos in them. In the same manner, make separate folders for two-star images. There is no need to retain the one-star rated images.
Step-7 Selecting the winning images
Now it is time to select the winning images. For this, right click the three-star folder and select Browse in Adobe bridge. All three-star rated image will now open in Adobe Bridge. Now it is the time for the judges to shortlist the winners. Once again you will have to show them all three-star rated images, but this time, they will select only the winning images. For this, we will use a very innovative feature of bridge, the Review Mode. Select all the 3-star photos by clicking CTRL+A then Press CTRL+B to start review mode.
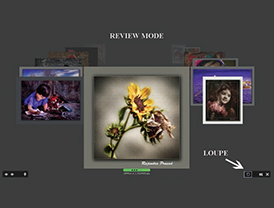
Review mode is a dedicated full-screen view for browsing a selection of photos and refining the selection. Review mode displays images in a rotating ‘carousel’ format. The screenshot will give you an idea.
In this viewing method, you can click the left or right arrow buttons at the lower-left corner of the screen, or press the left or right arrow key on your keyboard to go to the previous or next image or drag the foreground image right or left to bring the previous or next image forward. You can also click any image in the background to bring it to the front if needed. In review mode, there is also a ‘Loupe’ tool, which lets you magnify a portion of an image. Sometimes judges would like to view a portion of image in detail. The Loupe tool is available at the lower right side of the screen in review mode. By default, if the image is displayed at less than 100 percent, the Loupe tool magnifies it to 100 percent. To hide the Loupe tool, click the X at the lowerright corner of the tool, drag the Loupe tool to a different area or in the image, or click on a different area of the image to change the magnified area. To zoom in and out with the Loupe tool, use the mouse scroll wheel, or press the plus (+) or minus (-) key.
Let the judges view the images. When an image is selected, press CTRL+8 and you will notice that the star rating has also been labelled with green colour. After all the award winning images have been selected, you have to sort them. Press ESC button to go to thumbnail mode. Now click CTRL+A to select all the photographs of the folder. On the right upper side of the bridge interface, you will see a star mark. Click on it as you did before, but this time select ‘show labelled item only’. Now you will see only those images that have been labelled with green colour. Click CTRL A to select all labelled images and then Press CTRL+X to cut them. Now make a new folder, give a suitable name and paste all the labelled photos in them with CTRL+V. Now open this folder and rename photos according to the prize or position.
 Step-8 Automatically extracting the file names for printing
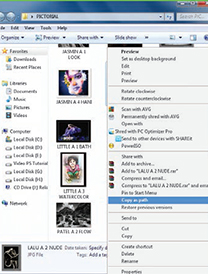
Earlier, we used to manually jot down the names of accepted and awarded entries, but now it is easier than that. Sadly, Adobe Bridge does not have any provision for extraction of only file names. So I experimented and found a way using Microsoft Excel. First open the folder containing the awarded or accepted entries. Press CTRL +A to select all images then SHIFT+RIGHT CLICK and you will see a new option Copy As Path. Clicking on this option will only copy the file path. Now open Excel and select an entire column. Paste the file names using CTRL+V. You might see a dialog “Data on the clipboard is not the same size as the selected area. Do you want to paste anyway”. Click OK. Now you will get a column with each image path in a cell. The file names may not fit in the column and hence you will have to drag the the partition line at the top (don’t miss this step).
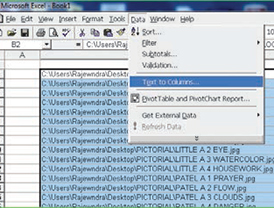
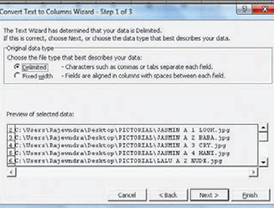
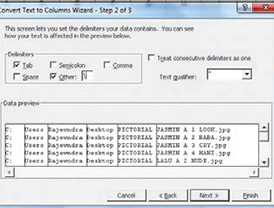
At present, the file path is in one column and hence we need to delete some unwanted text. For this, you will have to first separate them into different columns. First select all data of columns containing file path by clicking and dragging. Now open the Data menu and click Text To Columns and a new dialog box will open. Here, in the file type, select delimited data and click next to open the second dialog box. Here, check the Tab and Other check boxes. In the text box next to Other option, type \. Click next and you will see in the preview that all the text is now in different columns. Now click finish. You can then delete the first three or four columns containing unwanted data.
Hope this article helps salon organisers in reducing their workload. Screenshots are of Abobe Bridge 5, which I am using. Please note that before running any salon, try the method outlined above with few photographs and practice it well. |SP

