
 In the previous issue, we introduced the DGFlick Edit Xpress PRO, and had promised to cover more of its features in the subsequent issues. So this time, we will get familiar with the Enhance option, which has the major chunk of editing options. Essentially, Edit Xpress is aimed at album makers, and specially wedding photographers. But we are using non-wedding images to demonstrate the utility of this software.
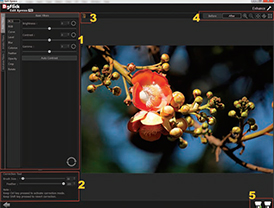
The Enhance option brings up the Enhance screen. To get familiar with the page, I have marked the different sections of this page.
1. Here you can find the different filters available to enhance your images. The options include Basic Filters, Artistic Filters and Advanced Filters. You can control the strength of the filter applied using sliders. It also provides an option to reset the filter if you are not satisfied with the job.
2.Here you can find the Correction Tool, which allows you to selectively undo the effects. There are two sliders here, one to control the brush size, and the other to control the hardness of the brush.
3. This option lets you revert to the original image without making any change.
4. Here you can find many options such as Before and After, Zoom-in, Zoomout, Fit to Screen, Actual Size and Full Screen options.
5. Finally, you have the Save Copy and Save options. Click on Save if you are satisfied with your progress so far and do not want to create a copy. Choose Save Copy if you do not want the original to be over-written.
Now let us take a look at the different filters available.
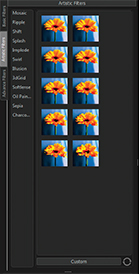 Artistic Filters: These are for people who like to give special effects in still images. The filters include Mosaic, Ripple, Shift, Splash, Implode, Swirl, Illusion, 3d Grid, Soft lens, Oil Painting, Sepia, and Charcoal. These effects can be applied to give an artistic feel to the images, but if you are not careful enough, these can make the image look unprofessional. Oil Painting and Sepia can be used to render a vintage effect to your images so that they look like a part of history.
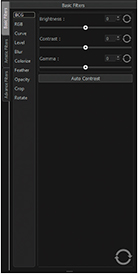
Basic Filters: These are the essential editing options, and provide choices such as BCG (Brightness, Contrast, Gamma), RGB (Red, Green, Blue), Curve (Similar to Curve option available in Photoshop), Level (Similar to Level option in Photoshop), Blur, Colorize, Feather, Opacity, Crop, and Rotate. These filters help in colour correction and preparing images for albums and photo books, which are the most important segments that DGFlick caters to. We will see each of these in detail later.
Advanced Filters: Here you can install plugins. DGFlick says that most Photoshop Plugins work in Edit Xpress.
While applying filters, make sure that you have selected the ‘After’ option in Section 4 so that the changes are visible in the image. Clicking the Auto Contrast button is a quick-fix solution if you do not want to fiddle with the controls manually. When you apply the filter, the whole image gets affected. So if you need to delete the effect from any part of the image, use the Correction Tool at the left bottom. To apply corrections, you have to keep the CTRL key pressed and run the brush over the part to be corrected. If you have made a mistake, you can redo the filter (undo the correction) by pressing the Shift key and using the brush. This process is the same for all filters. Please note that there is no option to finely control the strength of the filter at different points, such as Opacity option in Photoshop. A workaround would be to save the file each time you apply a filter of a particular strength, correct if required, and then reopen and apply the filter with a different strength to another portion of the image.
