 Our Imaging Expert No one can take a picture that everyone likes. But, almost every picture can have scope of improvement. Often, we are not our best critics, while others can immediately point out the faults. In If I were you, our expert comments on how your pictures could be taken to another level.
E-mail your images at sp@nextgenpublishing.net
Rohinton Mehta,
Technical Editor, Smart Photography
Late Evening

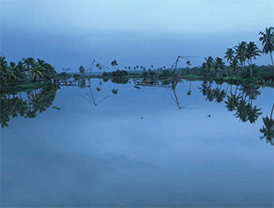
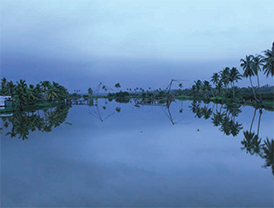
This late evening shot is sent to us by Srini M B. He says “The Picture was taken at around 7.15 PM (hand held) during an overcast day at Kadamakudy, a wetland near Ernakulam. The people in the area are mainly into fishing as you can see two giant Chinese fishing nets in the picture. I have not done any post processing on the picture. I request you to give your views on the picture and how it can be improved”.
A good attempt. But why is the picture so blue? What was the White Balance set to? Is the blue colour intentional or is it because you had inadvertently set the WB to Incandescent? In the absence of these answers, I am assuming that you wanted the blue cast. However, I think the blue is too strong. In the edited image, I have reduced the blue and cropped the picture so that the horizon does not cut the picture in two equal halves.
Buramadmaheswar Scene
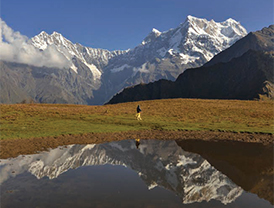
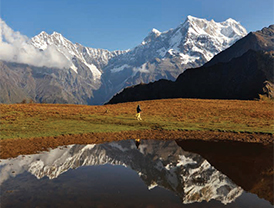
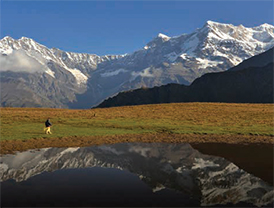
Shyama Prasad Sain from West Bengal has sent us two versions of the same image – one original and the other that he has edited in Photoshop. He wants to know how it could be further improved.
This is a nice picture, taken on a clear day. But here are my thoughts on the same:
• The first thing that strikes me is that you have over-sharpened the edited picture.
• The person in the picture is in the dead centre of the frame.
• In my opinion, the reflection is actually competing with the main subject.
• Your image is 10 x 8” (a ratio of 1.25:1), which, according to me, is not the correct ratio for most landscapes. In the picture that I have edited, I have, using Photoshop:
• Made the sky a bit deeper.
• Using Content Aware Move Tool, I have placed the person where I think the person should have been when you took the picture.
• Toned down the reflection using the Gradient Tool.
• Stretched the image using the Image Size dialog box (A wider image looks better than a squarish one when it comes to a landscape; if you observe very carefully, the person in the frame appears slightly stretched sideways).
• Cropped a bit from the bottom.
• Applied just a dash of sharpening.
Note: In case you have edited a JPEG image, do note that JPEG images are already sharpened in the camera, depending on the way you have set it up. Hence JPEG images can often do without any sharpening.
Beautiful Mountains
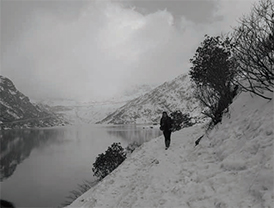
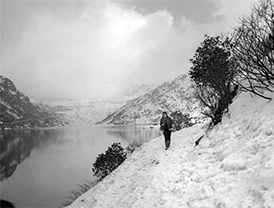
Dibyendu Debnath from Kolkata, a banker by profession and a nature lover, has taken this photo in Sikkim. He mentions that photography is his passion and hobby but at the same time, acknowledges that he does not know Photoshop very well. He has tried to improve the picture (which was taken in dull light) in Lightroom but is not happy. He has requested a detailed explanation on how to improve the picture.
Dibyendu, our efforts should be to get the picture as correct as possible, in the camera itself.
Bright subjects occupying a large area of the frame (as in your picture) can cause underexposure. The exposure meter is designed to turn whatever it is pointed at, Camera: Nikon D5200; Lens: 18-55mm at 18mm Aperture: F/14; Shutter speed: 1/80sec; ISO: 200 Original Edited to a mid-tone. This is the reason why the snow in your picture appears greyish instead of white. In such circumstances, we need to give more exposure. Since the light was dull, I feel that + 0.7-1 stop would have made the snow as bright as you probably
saw it.
Note that opening up the exposure by 0.7 – 1 stop, would further lighten the already light sky where the sky meets the mountains and possibly reduce the details. If the skyline was level (it is not in this case), I would have used a graduated neutral density ilter to bring back details in that area. In this case, however, I had to resort to Photoshop to slightly tone down that area.
I also brought in some details on the lady’s face and clothes. Here is a method I often use in Photoshop to tone down (darken) or brighten (lighten) areas of the image.
• Open the Layers panel, if not already open (Press the F7 key on the keyboard).
• Press Shift + Ctrl + N. A dialog box will open. Click in the box that says Normal and select Soft Light. Also check (tick) the square where it says Fill with Soft-Light-neutral colour (50% grey).
• To darken any area, use the Brush Tool with black as the foreground colour (in the Toolbox, the black square should be in the front); to lighten any area, use the Brush Tool with white as the foreground colour (pressing the X-key on the keyboard will change the foreground/ background colour). The Opacity and the Hardness of the brush can be set as desired. |SP

