
 In part III of this series, we shall see how to use ‘Curves’. ‘Levels’ and ‘Curves’ do the same thing – adjust contrast, and thereby, indirectly, adjust the dynamic range – though Curves does it in a more refined way. Curves is also a bit more difficult to use, as compared to Levels. But we won’t let that come in our way. We will also do some further editing if necessary to enhance the picture.
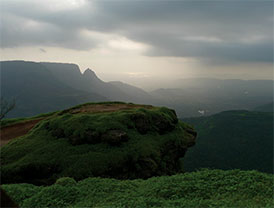
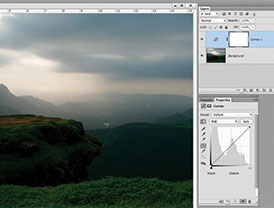
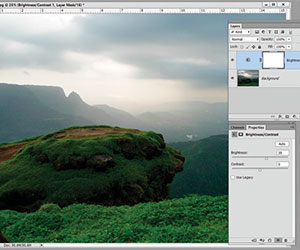
1Open in Photoshop an image that you want to edit. The image we have is the Lion’s Head at Louisa Point in Matheran, a hill-station about 100kms from Mumbai. (You can download this image from the following URL: https://drive.google.com/open?id=0B0n0nvc-jnIDeC1FYXpYQnNVTTQ. The image will be available for download till 30th April 2017). Open the Layers panel (F7 key) if not already open. Click on the Adjustment Layer icon (the half-black, half-white circle at the bottom of the Layers panel) and from the dropdown menu, select Curves. (Printscreen 1). Notice the new (blue) adjustment layer for Curves in the Layers panel, along with a lock – a safeguard – so that a beginner does not unintentionally ruin the original image. You will also see the Properties panel.
Note: The beginner may be confused when he creates an adjustment layer for ‘Curves’ but finds no curve! This is because there isn’t any! The diagonal line that you see in the square, will turn into a curve when you do the adjustments.
2 Now, like we did with Levels (SP, January 2017), we first need to be
clear as to what we want to do with the image. This is very important. In this particular image, I find that the foreground and especially the middle ground (the Lion’s Head) is rather dark. We need to lighten these areas.
3 Click on this icon in the Properties panel to activate it. Notice that now when you hover the cursor over the image, the cursor turns to an Eyedropper Tool. Also notice that as you move the cursor all over the main image, you see a small square moving up or down the diagonal line in the Properties panel. This tells you the position on the Curve that relates to the point (in the main image) the
cursor is on.
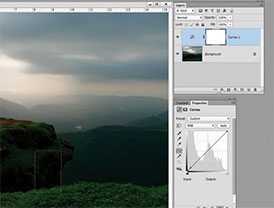
4 In our picture, I want to open up the shadow areas on the Lion’s Head. Keeping the Alt key pressed, I clicked in the dark region shown in the dotted lines in the accompanying Printscreen 2. This action placed a small square on the diagonal line in the Properties panel (see at the lower end of the diagonal line). To lighten that area, you hold that point with the cursor and drag it in the upwards direction (if you wanted to darken that area, you would have dragged that point in the downward direction). As the shadows start to ‘open up’, the other areas will lighten too. (See pic at bottom). If you click on the eye icon i the active layer (the
one marked in blue), you will see the ‘before/after’ of your edit.

5 In this particular example, I do not want to lighten the other areas (the areas other than the dark areas which we ‘opened up’ using Curves). This is where we will make use of the white Mask that you see adjoining the active layer. (You will observe that a Mask automatically forms when you create an adjustment layer for either Levels or Curves). The Mask allows us to selectively edit certain areas ofthe image, without applying global edits (global edits refers to the edit applied to the entire image). A white Mask reveals; a black Mask hides (more of it in future articles in this
series).
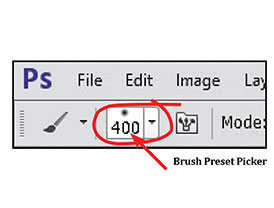
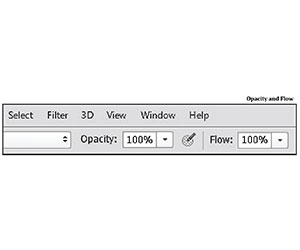
6 Observe that the white mask has a border around it. This means that the Mask is ‘active’. Even then, as a precautionary measure, click once on the mask (just to ensure that it is active). Now, using the Brush Tool (shortcut, the B key on the keyboard) set to 0% Hardness, paint on the fine control over how much you want to darken, just in case you do not want to darken those areas as much as before the Curves adjustment was applied. To control this feature, reduce either the Opacity or the Flow (See Printscreen Below). A smaller percentage will have lesser effect whereas a higher percentage will have a stronger effect. For this particular image, I have used the Brush Tool at 100% Opacity/Flow. Observe the white Mask in the Layers panel on the opposite page; it now shows (in black) the area that you worked on in step 6. Flatten the Layers (Layer>Flatten Image)
The picture now looks definitely better as compared to the original. But I still find it a bit on the dull side. To remedy that, create another adjustment layer for Brightness/ Contrast (click on the half-black, half-white icon at the bottom of the Layers panel and select Brightness/ Contrast). Adjust the Brightness to your liking. I have set the Brightness slider to 35. This has brightened the Lion’s Head and the foreground, but also brightened the remaining area (which I did not want to be lightened). So repeat the instructions you see in step 6 and recover the details.
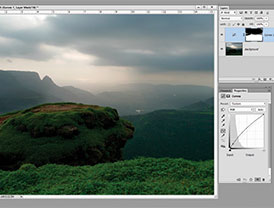
The final picture is shown below.
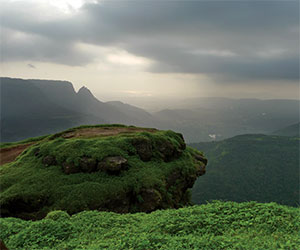
(I don’t like the dark spot at the left hand bottom corner. I am not sure how or why that happened; maybe someone walked into the frame; maybe some other obstruction. This can be corrected using the Clone Stamp Tool, which we will discuss in a later issue of SP). Happy editing! |SP
