
 Let’s first recap what we learned in the earlier issues about image editing: Part 1: How to set-up Photoshop for optimum performance (December 2016) Part 2: Setting the optimum screen resolution on your computer; What are you looking for from Photoshop?; Using ‘Levels’ the wrong way; using ‘Levels’ the right way; The Tool Box; Using the Ruler Tool to straighten tilted horizon (January 2017) Part 3: ‘Curves’ (February 2017)
Rohinton Mehta
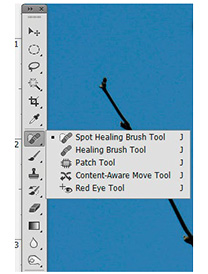
In Part 4 of this ‘Learning’ we will see how to use some of the ‘Cleaning-up Tools’. We will learn about the Spot Healing Brush, Healing Brush, Patch Tool and the Clone Stamp Tool. Please see the printscreen showing the various ‘cleaning tools’. On the right bottom of the icon for most tools, you will see a small arrowhead. This means that there are other tools nestled there. You place the mouse curser over a group of tools, click and hold the cursor to see the other tools nestled therein. Remember, you will see displayed in the Toolbox the last tool that you have used. For example, if you have used the Patch Tool, then the Toolbox will show the Patch Tool; if the last tool you used was Spot Healing Brush, the toolbox will display the Spot Healing Brush.
Spot Healing Brush (![]() )
)
Simply select the tool, adjust the brush size and click over the area that needs fixing (there is no need to define a source)
Tip: (1) This tool works very well in areas of low-detail like sky and clouds. Use it along with the Healing Brush.
(2) When using the Spot Healing Brush, make sure that you select Proximity Match from the Options Bar at the top.
As the name suggests, the Spot Healing Brush Tool helps us to get rid of spots due to dust on the imaging sensor; no matter how careful you are, dust will eventually settle on the sensor and will show itself as small out-of-focus blobs. The Spot Healing Brush Tool can also get rid of marks due to fine hairlike structures sticking to the imaging sensor. If you love to photograph people, the Spot Healing Brush Tool will help you to get rid of pimples and other small skin defects.
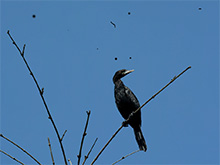
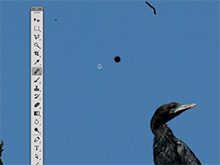
Let’s take an example. Image 1. On this image you can see (simulated) marks due to dust on the imaging sensor (I have actually created those marks to represent dust spots).
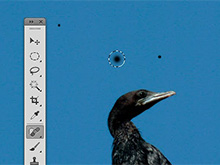
• First, make a duplicate copy of the Background (in the Layers panel) by dragging the Background layer to the ‘Create a new layer’ icon (the second icon from the right in Photoshop CS6). The new layer will be seen as ‘Background copy’.
• Pick up the Spot Healing Brush. Adjust the brush size (use the square bracket keys on the keyboard; the left bracket key – to reduce the brush size, the right bracket key – to increase the brush size.
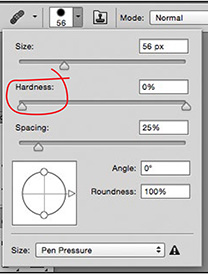
• Also adjust the Hardness of the brush from the Options Bar (the second bar from the top). Set it to 0%. This will ensure that the brush does not leave any hard edge marks.
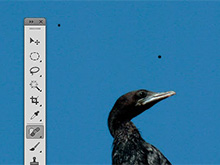
• Now go over the spot that you want to get rid of, and mearly click on that spot. In a split second, the offending spot will vanish. If required, you may click the mouse again till the blemish goes away.
 Healing Brush (
![]() )
)
This works very similar to the Clone Tool. The difference is that the Healing Brush copies the texture of the source area and also blends the colours. This generally results in a natural looking correction. The Healing Brush is especially helpful in areas of sky and clouds.
Note: The Healing Brush does not work too well near edges and strong contrast areas.
When using Healing Brush, make sure that Source – ‘Sampled’ is checked and ‘Pattern’ is un-checked.
![]() In the Sample box, tick ‘All Layers’. Tick ‘Aligned’ (most of the time). This helps to avoid repeated patterns.
In the Sample box, tick ‘All Layers’. Tick ‘Aligned’ (most of the time). This helps to avoid repeated patterns.
What’s the difference between the Spot Healing Brush and the Healing Brush? When using the former, you don’t have to press the Alt key; you place the curser directly over the spot that you want to get rid of, and click. With Healing Brush, you need to select a source area while pressing the Alt key, release the Alt key and then click on the spot you need to get rid of.
