
 Patch Tool (
![]() )
)
The Patch Tool can be used in two different ways: Source or Destination. When using Source, select the area to be repaired, and drag it to a new area. When using Destination, first select a clean area from where you want to pick up, and drag it onto the damaged area.
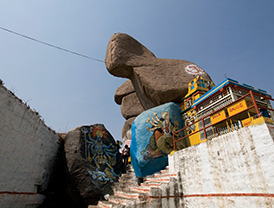
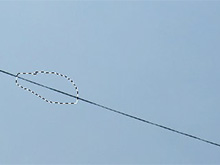
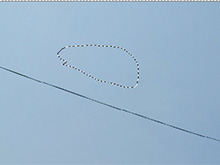
When you select the Patch Tool, you will notice on the Options Bar a choice between ‘Source’ and ‘Destination’. Let’s first use the Source option. Here is a photo in which I want to get rid of the cables. I select the Source option. When selecting the Source option, you need to first select a part of the cable which you want to eliminate. Then drag the selection over to a clean area of the sky and let go of the mouse. Photoshop will automatically clean up the selected area. Ctrl + D to deselect. Now carefully observe the edited ends of the cable. You will see that the edges are smudged. This is an issue related to the Patch Tool; the Patch Tool should not be used where you want a clean, smudgeless edit.
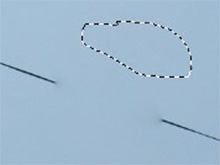
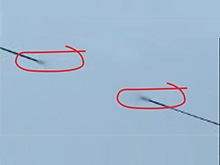
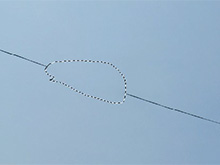
Now we will use the Destination option. First select a clean area of the sky and drag this over the part of the cable that you want to get rid of. Again observe that the edges of the cable are smudged. So, I’ll repeat the earlier warning – the Patch Tool should not be used where you want a clean, smudgeless edit. Then how do we get a clean smudgeless edge? The answer is to use the Clone Stamp Tool.
 Clone Stamp Tool (
![]() )
)
The Clone Stamp tool copies pixels from point A (source) to point B (destination). On the Options Bar at the top, In the Sample box, tick ‘All Layers’. Turn ‘on’ ‘No Adjustment Layers’ (this is the small half-black, half-white circle with a line running across it. When you turn it ‘on’ there will be a border around it ). Tick ‘Aligned’ (most of the![]() time). This helps to avoid repeated patterns Remember, the Clone Tool picks up from the point where you have the + sign.
time). This helps to avoid repeated patterns Remember, the Clone Tool picks up from the point where you have the + sign.

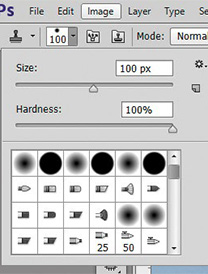
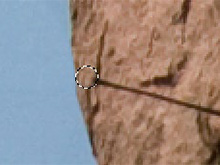 Let’s say that we have now eliminated most of the cable using the above methods and come close to the rock. You now know that using the Patch Tool or the Healing Brush Tool will leave smudged edges. The solution is to use the Clone Stamp Tool, which allows you to harden (or soften) the brush edge. Select the Clone Stamp Tool. Set the brush’s hardness level to 100% as shown below and select the brush size using the square bracket keys on the keyboard. Keeping the Alt key pressed, sample the area of the sky close to the rock – see above (Alt + click the required area of the sky). Align the edge of the brush with the beginning of the rock (enlarging the image to 100% or more will help) and click. You should get rid of the cable without any smudging/softening on the rock surface.
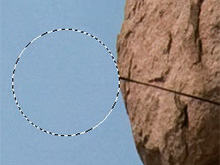
Now sample an area of the rock (Alt + click the required area on the rock) and click on the part of the cable passing over the rock. (Top image on the right). The trick is to sample an area that will match the area that you are editing. Continue till you eliminate the entire cable.
After the job is complete, enlarge the image to 200% and then inspect carefully the entire image for any area that you may have missed attending to. When any image is enlarged, you can keep the Space Bar pressed and the curser will turn to a Hand Tool which will allow you to move the image as desired. Once you are satisfied with your edits, you may save the file using the Save As command. |SP
