
Earlier issues: Part 1: How to set-up Photoshop for optimum performance (December 2016) Part 2: Setting the optimum screen resolution on your computer; What are you looking for from Photoshop?; Using ‘Levels’ the wrong way; using ‘Levels’ the right way; The Tool Box; Using the Ruler Tool to straighten tilted horizon (January 2017)
Part 3: ‘Curves’ (February 2017) Part 4: Cleaning-up tools (March 2017) Part 5: Blending Modes (April 2017)
Rohinton Mehta
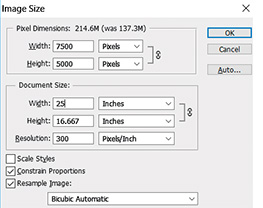
The pixel rating of your camera determines the native image size. For example, a 24 megpixel camera may offer an image size of 6000 x 4000 pixels. This means that the longer side of the image has 6000 pixels and the shorter side has 4000 pixels. If you want to know the image size in inches, you need to divide these dimensions by 300 (300 pixels per inch being the industry standard for printing). In our example that would be 6000/300 and 4000/300 or 20 x 13.33 inches. This is what we call ‘native size’. If you were to print at a slightly lower resolution (say 240 ppi), then the print size in our example would be 25 x 16.66 inches. (For those who may wonder if reducing the print resolution from 300 to 240 ppi will cause a loss in image quality, the answer is ‘for all practical purposes, you are unlikely to notice any loss’.
Increasing Picture Size
So far so good. But let us assume that you need a larger picture. Is there a way to do that? Yes, there is. It is known as “Ineterpolation”. The first question that comes to mind then, is, “how large can I make my print, without it showing signs of deterioration in image quality”? The answer could vary from person to person but here’s my take on it: For an imperceptible loss in image quality, (and if your equipment is high-end and if your shooting technique is perfect), you could go double the native size; in our example, that would be 40 x 26.66 inches at 300 ppi. (This also assumes that you are technically sound using an image editing program, like Photoshop). If you are using a beginners/mid-end camera, increase the native image size not more than 1.5 times.
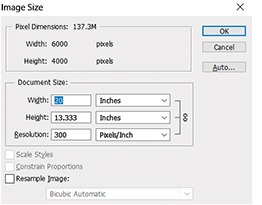
I am currently using Photoshop CS6. Have a look at Printscreen 1. It tells us that the Document Size (the print size) at 300 pixels per inch (ppi) will be 20 x 13.33 inches. It also shows us the pixel dimensions as 6000 x 4000 pixels and the file size as 137.3 megabytes (shown as M).
