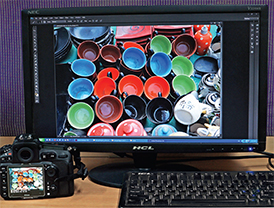
1. The camera LCD Monitor is much brighter
1 How to adjust your camera’s LCD brightness
I have yet to come across a digital camera’s LCD that is not overly bright. May be this is a marketing decision (so that even your underexposed images look fairly okay on the LCD). When images are transferred to a computer, they almost always look darker. So how do you adjust the brightness of the camera LCD to match the computer monitor?
1. After loading the images on to your computer, put the memory card back into your camera, but do not format the card (formatting the card would delete the images).
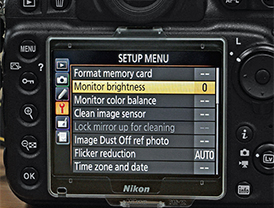
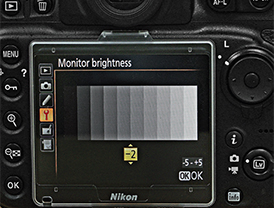
2. Adjust the LCD Monitor’s brightness 2. Adjust the LCD Monitor’s brightness
as required as required
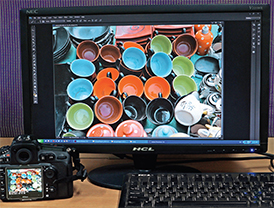
Open an image (one that has proper tones) on the computer monitor and navigate to the same image on your camera. Hold the camera close to the computer monitor (taking care that the light from the monitor does not shine on to the camera’s LCD) and compare both images for brightness (not colour or sharpness). You will notice that the image on the camera is brighter. Now lower the LCD brightness till the two images look more or less equal.
3. Compare again
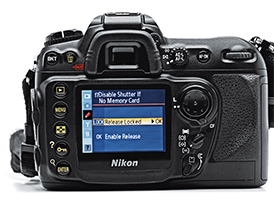
2 How to ensure that you don’t shoot without a memory card
I know of photographers who inadvertently covered weddings without a film in their camera! The digital photographer can face a similar problem. So how do you ensure that you – the digital photographer – never commit the same mistake?
Digital cameras offer a feature, which, when enabled, will prevent the shutter from firing if there is no memory card in the camera. Just make sure that you enable that feature.
But why don’t camera manufacturers make this a permanent feature, whereby you just cannot fire the shutter if there is no memory card installed? Well, there’s a good reason. If you connect the camera directly to a computer, there is no reason to first write to the memory card and from there to the computer; you simply write directly to the computer. Now if the ‘don’t-fire-theshutter- without-a-memory-card-inside’ feature was permanent, you just could never write directly to a computer!
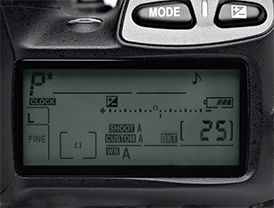
Flexible Program mode
3 How to use Program (P) mode as a Shutter Priority/Aperture Priority mode
We all know that Program mode (P) automatically selects the shutter speed as well as the aperture. It might appear that the user has no control (or very little control if the ISO is manipulated) over the shutter speed or the aperture used since these are ‘set’ as per the algorithms (instructions) programmed into the camera. But what Flexible Program mode if you want you use a particular shutter speed (like in Shutter Priority) or a particular aperture (like in Aperture Priority) while still in the Program mode?
Most digital cameras offering Program mode, also offer a little-known subprogram, called Flexible Program. When you set Flexible Program, you’ll see a little asterisk mark (*) next to the ‘P’ for program. In Program mode, you turn the Command Dial till you see the * mark next to the ‘P’. Now your camera is in Flexible Program mode.
Let’s say the camera has selected 1/125 sec at f/11 in the Program mode but you wish you could use 1/500 sec to freeze subject movement. You get into Flexible Program mode and turn the Command Dial till you see 1/500 sec instead of 1/125 sec. The aperture will correspondingly change to f/5.6. The amount of light hitting the imaging sensor has not changed, only the parameters have. You have just used the ‘P’ mode as a Shutter Priority mode!
Now lets say that you decide to use the camera (in ‘P’ mode) as an Aperture Priority mode. Again, shift over to Flexible Program, and this time (assuming that your camera shows 1/125 sec at f/11) you turn the Command Dial till the aperture changes from f/11 to whatever aperture you need. As an example, if you select f/22, the shutter speed will now change to 1/30 sec, again allowing the same amount of light hitting the sensor as with 1/125 sec at f/11. You have now used the ‘P’ mode as Aperture Priority mode!
For the less initiated: All the shutter speed / aperture combinations shown below allow the same quantity of light to enter the lens. In other words, the exposure does not change (but action stopping power / depth of field will change).
Shutter Speed Aperture
in seconds
1/30 f/22
1/60 f/16
1/125 f/11
1/250 f/8
1/500 f/5.6
1/1000 f/4
1/2000 f/2.8
1/4000 f/2
1/8000 f/1.4
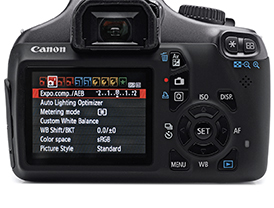
4 How to use Exposure Compensation
Exposure compensation allows us to override the exposure suggested by the exposure meter. Under certain lighting/ contrast conditions, exposure meters do not convey the correct exposure. As an example, a person standing in front of a vast expanse of brightness (a white/light tone wall or open sky) will appear dark in the picture if the exposure settings recommended by the exposure meter is followed. Similarly, a person standing in front of a dark/black background will appear lighter in the image if the exposure settings recommended by the exposure meter is followed. In such situations, the user can override the meter’s recommendation and apply plus compensation (subjects against light/white background) or minus compensation (subjects against dark/black backgrounds).
5 How to check for overexposed highlights / underexposed shadows
Checking exposure accuracy by just looking at your images on the camera LCD may not give you the correct idea.
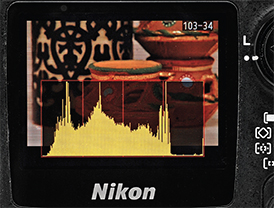
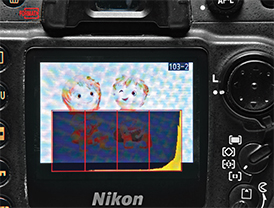
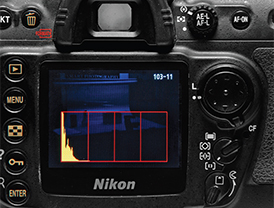
To be sure, get into the habit of checking histograms. Underexposure shows the histogram bundled towards the left; overexposure tends to move the histogram towards the right. If the histogram touches the left end, you can be sure that some area of the image is very dark/black. Similarly, if the histogram touches the right end, some area of the image is definitely overexposed. Corrective action can be taken if necessary.
Yet another important feature in most digital cameras is what is known as ‘blinkies’. When enabled, overexposed areas blink on the LCD to immediately warn the user.
Correctly exposed
Underexposed areas can often be ‘opened up’ (albeit, with a corresponding increase in digital noise), but once an area is overexposed beyond a certain point, no amount of image editing can bring back the lost details. Hence it is very important to pay attention to the ‘blinkies’.
Note: If you are shooting in Raw, you may be able to recover some lost highlight details (1 to 1.5 stops, depending on the camera) during post-processing.
6 How to check a tripod for stability
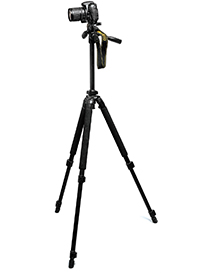
Just because you use a tripod, does not necessarily mean that your images will be sharp. The design, materials used for the construction and the way you use the tripod play a very important role in determining a tripod’s stability and hence the sharpness of your images. Generally, it is safer to assume that an expensive tripod will do a better job than an inexpensive one. Keep in mind that the lesser the number of sections, the steadier the tripod. A trick is to pull a section out to its maximum and then push back about an inch. This will slightly lower the maximum height of the tripod but will make it sturdier. But how do you check whether your tripod is doing well the job it was designed to do? After setting up the tripod and mounting your longest focal length lens (extend the lens to its maximum focal length if it is a zoom lens), tap the filter end gently while looking through the viewfinder. If you see the lens vibrating, the tripod is not perfectly suitable. Keep in mind that a tripod that is perfectly suitable for, say, a 300mm lens, may not be so when a 400mm lens is mounted. Also note that your tripod (with the camera mounted) should be capable of reaching your eye level. If you have to keep bending low because of insufficient height, you are unlikely to use that tripod for a long time.
Overexposed Underexposed
7 How to use a tripod I think I should have worded this as ‘how not to use a tripod’.
1. Never use the centre column, unless it is for very small adjustments. Remember, professional tripods don’t have a centre column! Using a centre column is like using a monopod on a tripod – shaky, to say the least.
2. Do not use the tripod with the sections pulled out to the maximum as this will weaken the joint between the sections. Pull out each section to the maximum (if required) and then push back about one-inch.
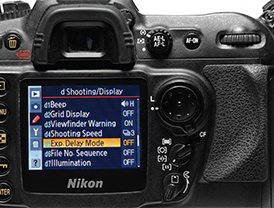
3. Just because your camera is on a tripod, does not mean that you should not be careful when releasing the shutter. It is better to use your camera’s self-timer set to say, 2 seconds and let the shutter fire without your touching the camera. If this is not possible because you want to control the exact moment the shutter needs to be fired, consider a wireless shutter remote. Some D-SLRs offer a built-in delay for firing the shutter (similar to using a selftimer with a small delay). If your camera has this feature, you could consider using it. After you press the shutter release, the camera will wait (to steady itself) before the shutter fires. (see pic. top right)
Wrong way to use a tripod
8 How to use a Monopod
A monopod can be quite useful when using the camera at slower shutter speeds. Of course it can never match a tripod, but is easier to lug around (and in an emergency, can be used as a support instead of a walking stick!)
Try using one and you’ll see that it is difficult to stop sideways and/or forward-backward movements. Place the monopod strap around your neck. If you are standing, place the monopod close to your foot and pull the monopod away from your body. This will stop the forward-backward movement. Alternately, if you could support the monopod against any other non-moveable support, that would improve the stability.
You could kneel on one knee and support the monopod against the other leg.
Useful hint: Anyone who has tried kneeling (hasn’t your teacher ever made you kneel in a corner?) knows how painful it is to kneel, especially on hard, uneven ground. Do yourself a favour and buy a pair of padded kneecaps. Your knees will bless you!
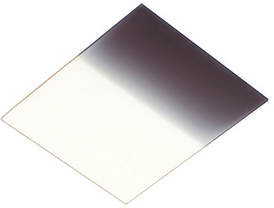
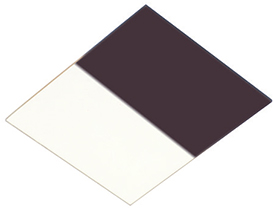
Gradual demarcation Sharper demarcation
9 How to use graduated filters
If you have ever tried to photograph landscapes with bald skies, you will appreciate graduated filters. Graduated filters come in various colours but the most common graduated filters are of the neutral density (ND) variety. There are two sub-varieties: one with a gradual demarcation and the other with a sharper demarcation. The ones with sharper demarcation work better with telephoto lenses while the ones with more gradual demarcation are better used with wide-angle lenses.
The situation: A beautiful landscape except for a bald sky ruining the shot.
After composing the picture, take a in-camera meter reading and lock the exposure (in case you don’t know how to do that, meter in manual exposure mode). Now hold the filter, just touching the lens and adjust its position while looking through the viewfinder (there are filter holders available for those who need them). The idea is to block the light from the sky area (in other words, underexpose the sky) while allowing the light from the foreground to enter without any restriction. The end result is darkening of the sky, without darkening the lower part, the foreground.
Note: If you first attach the filter and then meter, your metering will go wrong.
10 How to create a panorama using a fisheye lens
A fish-eye lens is an extreme wide-angle lens. For a lens to qualify as ‘fish-eye’ it must have a diagonal angle of view of 180 degrees or more (up to 220 degrees). Pictures shot with a fish-eye lens (non-rectilinear fish-eye) will show strong barrel distortion but if the subject is far away, the distortion will be much less.
Some image editing software, including Photoshop, allow you to turn a fish-eye image into a regular image. Some distortion may still be noticed at the sides but it generally does a pretty good job. Here’s how you can do this:
1. Open the fish-eye image in Photoshop and make a copy of the Background layer (First press the F7 key to open the Layers panel and then using the computer mouse, pull the ‘Background’ on to ‘Create a new layer’ icon at the bottom of the Layers panel).
2. Go to Filter > Lens Correction > Fisheye. The picture will transform into what appears to be a shot taken with a ultra-wide-angle lens. If necessary, crop the image.
Rohinton Mehta

