
Rohinton Mehta
There is hardly a picture that cannot be improved with image editing. While getting it right in the camera itself should be our priority, there are several reasons why that often does not happen. This series of articles is designed to help beginners come to terms with basic image editing. I strongly urge everyone, including those who do not consider themselves as ‘beginners’, to read these write-ups carefully; who knows, you may learn something new!
Few words on image editing programs
There are several image editing programs, some free, others, you have to pay for. Some free software that come to mind are GIMP, Picasa, Paint, Sumo Paint, PhotoScape, Pixlr, Irfan View, Fotor, Vintager, Photo Editor, and Zoner Photo Studio. The paid ones I know of are Corel, PaintShop Pro, Photoshop, and Photoshop Elements. The software that we will use is Photoshop, which is the ‘senior sibling’. The current version of Photoshop is Photoshop CC 2015, which is available only on subscription.
Why Photoshop?
If you were to ask me this question, you would be perfectly justified. First, I haven’t used each and every software mentioned above, and secondly, Photoshop is considered worldwide as the ‘gold standard’ for image editing programs.
In Part 1 of this series, we will first see how to set-up Photoshop for optimum performance. This is important. There are several settings – some very important, others not so important but more of personalised settings. We will talk about only to the important ones, just to avoid boredom and to keep things short and sweet. I am using Photoshop CS6 Extended, but most settings are similar in other versions.
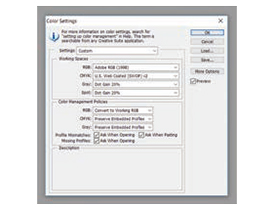
The first important setting concerns how our colours will appear. Go to Edit > Colour Settings. In the dialog box that opens, in the Working Spaces, in the RGB field, select Adobe RGB 1998. The next three fields (CMYK, Gray and Spot) are not important to us photographers. Let them be at any setting; we never make use of them. The moment you enter Adobe RGB 1998 in the RGB field, the Settings field will change from North America Prepress 2 (the default setting) to Custom.
Explanation: What we are doing here is setting the Colour Space (Colour Gamut). Adobe RGB 1998 is the recommended colour space for those who would like to edit their images. Note that Adobe RGB 1998 has a wider colour gamut as compared to sRGB, but is smaller than ProPhoto RGB. So, if ProPhoto RGB’s colour gamut is wider than that of Adobe RGB 1998, why is it not the recommended gamut? The answer is simple. Very few computer monitors (if any), can actually display all the colours possible with ProPhoto RGB; and even if a monitor could, there are no printers (to the best of my knowledge) that can print all those colours. This does not mean that ProPhoto RGB is useless; far from it. But as beginners, it would be prudent to stay with Adobe RGB 1998.
In the Colour Management Policies, again, the first field is the only important field for us. So, in the RGB box, select Convert to Working RGB. The next two fields (CMYK and Gray) don’t matter to us. Let them be anything.
Explanation: You may have set your digital camera to Adobe RGB colour space (which is what you should do), but your friend, for example, could give you his images for editing and his camera could have been set to sRGB. By telling Photoshop to convert such images to the optimum Working Space (which is Adobe RGB 1998), you are getting the best possible colours.
The three boxes under the Colour Management Policies should be ticked as shown in Printscreen 1. Now click the OK button in the right hand top of the Colour Settings dialog box.
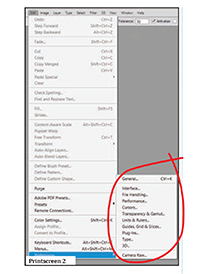
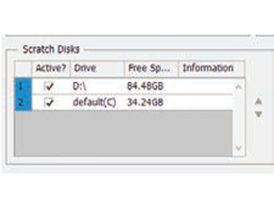
Now, go to Edit > Preferences. There are various Preferences as shown here (Printscreen 2). Note that these are ‘preferences’, similar to certain preferences that you set up on your digital camera. What are the features you like to have? For example, do you want a ‘beep’ sound when you complete a task? Do you want to zoom into the image using the scroll wheel of your computer mouse? What colour would you prefer as the backdrop for your images? As you can see, these settings are for your convenience; they are unlikely to change/alter the way your images will come out. Even then, here are a few suggestions:
