
Let us say that you want to increase the document width from 20 to 25 inches. First, check (tick) the box for Resample Image. When you check the Resample Image box, you are telling Photoshop that you wish to change the document size. Notice that when you check this box, the Constrain Proportions box automatically gets checked (ticked). This means that you need to change only one dimension (either Width or Height), and the other dimension will change proportionately by itself.
Please see Printscreen 2. We changed the Width from 20 to 25 inches. The Height automatically changed from 13.33 to 16.667 inches. The Pixel Dimension now shows 7500 x 5000 pixels and the new file size, which was earlier 137.3 MB, is now 214.6 MB. If you click the OK button, the changes will take place.
Note: If you are using Photoshop CS6 or Photoshop CC, and have set your Preferences correctly, you will see Bicubic Automatic displayed at the bottom end of the dialog box. If you are using an earlier version of Photoshop, you will have to manually set Bicubic Smoother from the dropdown
Menu.
Deceasing Picture Size
Now let’s assume that you wish to reduce the size of your picture. The native image size in our example above was 20 x 13.33 inches at 300 ppi. Let us a say that you wish to reduce the longer side to 10 inches. Since you wish to change the document (picture) size, you must check (tick) the Resample Image box. When you do that, the Constrain Proportions box will automatically get checked (ticked). Change the Width to 10 inches and the Height automatically changes to 6.667 inches (see Printscreen 3). Also notice that the file size, which was 137.3 MB will reduce to 34.3 MB if you click the OK button. This means that you will be throwing away the pixels forever! And that’s not good in my book of accounts! So how can we avoid this? There are two ways to achieve this.
1. Before you start the process to reduce the document size, make a copy of your original image (Image > Duplicate) and then close the original image. Work on the duplicate image so that the original stays intact.
2. Work on the original image but when saving the file, use the Save As option (you will have to give a new name to the file). This will create a new file. If by chance you use the Save command (instead of Save As), you will lose the original file (but Photoshop will also warn you before you click OK).
Let’s Play Some More with our Image Size
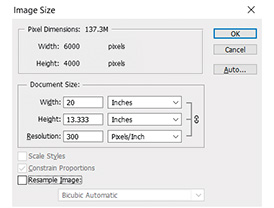
Please see Printscreen 4 (it is the same as Printscreen 1). This time, we will un-check the Resample Image box. Observe that the Width, Height and Resolution boxes are linked. This means that changing any one parameter will change the other two.

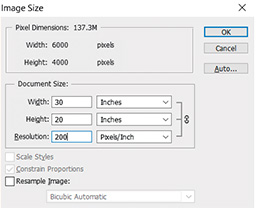
Let’s change the Resolution from 300 to 200 pixels/inch. The Document Size changes from 20 x 13.33 inches to 30 x 20 inches. But observe that the Pixel Dimensions have not changed! It is still 6000 (W) x 4000 (H) pixels. (Printscreen 5). In other words, the file size has not changed!.
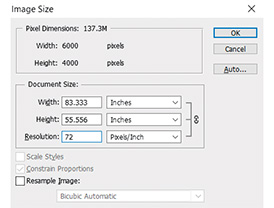
Let’s further change the Resolution from 200 to 72 pixels/inch. The Document size changes from 30 x 20 inches to 83.333 x 55.556 inches (almost 7 feet x a liitle over 4.5 feet). Again notice that the Pixel Dimensions have not changed! It is still 6000 (W) x 4000 (H) pixels. (Printscreen 6). In other words, the file size has not changed!
Let’s further change the Resolution from 72 to 36 pixels/inch. The Document size changes from 83.333 x 55.556 inches to 166.667 x 111.111 inches. Printscreen 7. That’s almost 13.88 feet x 9.25 feet! Again notice that the Pixel Dimensions have not changed! It is still 6000 (W) x 4000 (H) pixels. (PS 7). In other words, the file size has not changed!
Note: Very large prints (hordings) are generally printed at 72 or even 36 pixels per inch. If you were to view the hording from a normal reading distance, you will never be happy with the image quality. Because we view hordings from a great distance, we feel that the image is sharp.
To change the File Size (Pixel Dimensions, not just the Document/ Image Size), the Resample box has to be checked (ticked).
Please try out this tutorial on your own images and be conversant with increasing or decreasing your image size. |SP
