
 What exactly is Live View? Why do we need Live View, especially when we have lived without it for so many years? Is it just one of the newfangled features that puts some more pressure on our learning curve? Or, is it really a useful feature that could enhance our photography? Read on…
Live View is a function of a digital camera that allows us to ‘pre-view’ a subject/scene before an exposure is made. The image that is normally recorded on the sensor is directed to the viewing screen (the LCD). The LCD being larger than the viewfinder display, allows us to see an enlarged ‘pre-view’. While Live View is the default method to view our images on a compact digital camera (including point-and-shoot models and some mirrorless interchangeable lens cameras that do not have viewfinders), with D-SLRs you have to switch between viewfinder view and Live View mode. On some cameras with Live View, you can even check the effects of various shutters speeds/apertures (Live View Exposure Simulation). As an example, if you are photographing a waterfall, you can check on-screen (without actually taking the shot) the amount of silky blur that you would get at a particular shutter speed.
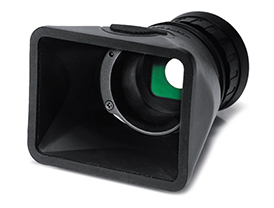
Hoodman loupe Press this button to enlarge the LCD image
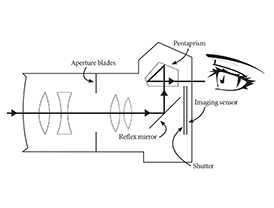
In an SLR, a reflex mirror directs the light from the subject on to the viewfinder (see sketch). When you press the shutter release button, the diaphragm blades stop down to the set aperture (the diaphragm blades normally stay wide open even though you set a particular aperture; this is done so that the image does not go dark), the reflex mirror swings out of the way, the shutter blades open to allow the light to strike the film/sensor and the exposure is made. After the exposure time is over, the process is reversed – the shutter blades close first, the mirror comes down to its original position, and the diaphragm blades open up fully once again.
When you set your D-SLR camera to Live View mode, the reflex mirror swings out of the way and the shutter opens to allow the image to fall directly on the imaging sensor, which then digitises it and feeds it to the image processor. The processed image is then fed directly to the LCD where you can pre-view the image. At this time the image is not recorded to the memory card because a circuitry bypasses the recording stage. When you press the shutter release button all the way, the recording circuitry is energised and the image is recorded to the memory card. Because the mirror swings out of the way and blocks the light path to the viewfinder during Live View, you cannot see the subject through the optical viewfinder during this time.
Okay. That’s fine but what extra benefits do we get using Live View?
Here they are:
1. More accurate autofocussing
When we use the viewfinder to autofocus, the camera uses a method of autofocussing called ‘Phase Detection’. When we use Live View to autofocus, the camera uses a method called ‘Contrast Detection’. Phase detection is faster than contrast detection but contrast detection method, though slower, is more accurate. During contrast detect AF, the focussing mechanism turns the focus ring beyond the point of peak focus and then back, narrowing down the gap each time till peak focus is achieved. This is the reason why contrast detect AF is slower. It is more accurate since the lens only stops autofocussing when maximum contrast is achieved on the image that falls on the imaging sensor (an image is at its maximum sharpness when the contrast between the different elements within is at the maximum).
Live View focussing also helps when the light levels are low, because it is easier to check for sharp focus on the larger LCD screen than it is on the comparatively tiny viewfinder.
2. More accurate manual focussing
There are situations where manual focussing is preferred, like when photographing landscapes or macro.
Here is a simple method to get very accurate manual focus:
First tripod your camera and autofocus using the viewfinder (VF focussing is faster). Now switch to Live View and manual focus. Observe the image on the larger LCD screen and manually fine-tune the focus for maximum contrast. If your camera permits you to enlarge the Live View image (most do), you will be able to achieve sharp focus even more accurately. It can also help if you can view the LCD screen through a magnifying loupe such as the Hoodman .


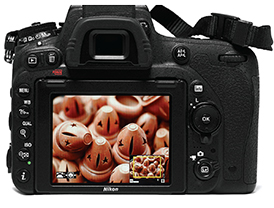
Simulated image. Touch the screen
where you want the
lens to focus (as shown by the
green rectangle)
3. Movie shooting with a D-SLR
If you are shooting movies with a D-SLR, you can only do so with contrast-detect Live View (non-D-SLR cameras using electronic viewfinders allow you to shoot movies using the EVF but not D-SLRs), but the Canon EOS 70D has incorporated phase detection AF during movies too. Others may follow suit.
4. Autofocussing via the touch-screen LCD
Some digital cameras allow a very easy and quick way to autofocus during Live View. Just point the camera towards the scene and touch that part of the screen where you would like the camera to autofocus. Voila!
Rohinton Mehta
