

 Exposing for HDR
I have tried my hand at creating HDRs but have always failed. While I seem not to have any issues while post-processing in Photoshop, I think my problem is knowing exactly how to expose for HDR. Can you help?
Arun Pathak, via email
For those who may not be aware, the imaging sensor in our digital cameras cannot faithfully reproduce the brightness range that is often present in a brightly lit scene. HDR imaging is a method that allows us to record a higher range of brightness than what is possible through a single frame exposure. Generally, we create a bracket of 3 or 5 frames with varying exposures and then blend them together using a suitable software.
Many books have been written on this topic which can get rather very technical. I shall try to explain this in a simpler manner.
Mount your camera on a sturdy tripod and compose your frame. For best results, shoot in Raw but if your computer is short on memory, you may try shooting in JPEG.
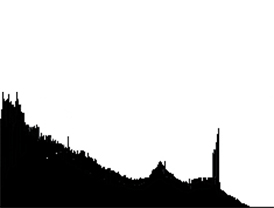
1. Your first exposure should be for capturing the highlights correctly, but without clipping (overexposing) the highlights. So expose a frame and check the histogram. Since you are exposing for the highlights, the picture will be very dark and the histogram will be very much to the left. You might find that there is a lot of space to the right that the histogram has not occupied. If so, take the next shot with some more exposure so that the histogram appears like what you see in the accompanying sketch.
Ensure that the highlights are not clipped (overexposed).
2. For the second shot, ‘open up’ the exposure by 2-stops but ensure that this is done only by reducing the shutter speed (the aperture should remain the same during all the frames that you shoot to create the HDR). This should get us the proper midtones.
3. Continue by taking the third shot with another 2-stop extra exposure. Keep an eye on the resulting histogram. We want the begining of the histogram (the shadow areas) to go about halfway to the right as possible. If that is not so, take one more shot with a 2-stop increase in the exposure, till the histogram appears like what you see here.
The highlights are overexposed here but we are concerned only with capturing as much shadow detail as is possible. Remember, in step 1, we have already captured the maximum highlight detail, without overexposing the highlights.
Once the images are placed in the HDR software, the software will merge them by taking the properly exposed highlights from the first exposure, the properly exposed mid-tones from the second exposure and the properly exposed shadows from the third/last exposure. The final result will have a range of brightness that would not have been possible to capture through a single exposure.
Please caution on the side of ‘overcooking’ the image. HDRs often show excessive shadow detail, which may appear wrong to some people. After creating an HDR image (and I love HDR images), I often tone down the shadow areas a wee bit so that the image does not look over-processed.
 Filters and Image Degradement
I am new to photography. Some of my friends never use filters because they say that filters degrade the image quality.
1. Do filters degrade the images?
2. Can I use a welder’s glass in place of a deep neutral density filter?
Rajaram Bhat, via email
1. This is an ongoing debate – one which will never end. To put it simply, a high-end filter, which is clean and spotless, will not noticibly degrade the image quality; even if it does in theory, you are not likely to notice the difference. However, a poor quality filter (and the market is full of such) can definitely degrade the image quality.
If for any reason, the filter is not absolutely parallel to the front element of the lens, you can expect a loss in image quality. A filter that does not have multi-coating or is poorly coated, can also have issues with flare and ghosting. At all times, avoid the sun directly hitting the filter. A lens hood is recommended.
2. When I started photography some 40-45 years ago, I tried using my sunglasses to increase the contrast in my black & white photographs, because I had no money to buy a regular filter. It did seem to work but the curvature of the sun-glass caused uneven sharpness that I couldn’t correct. A welder’s glass could work as an experiment, but it can never replace a good ND filter; good filters are made from the same type of glass that is used in making the individual lens elements. (Filters are also made from plastic, but they tend to scratch easily). The welder’s glass may also cause a colour cast which could be troublesome to get rid of.